Description
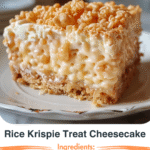
A giant Rice Krispy Treat crust filled with marshmallow-cream cheese cheesecake—light, fluffy, and no oven required.
Ingredients
FOR CRUST:
- 6 cups Rice Krispies cereal
- ¼ cup salted butter
- 1 (10 oz pkg) miniature marshmallows
FOR FILLING:
- 1 (8 oz pkg) cream cheese, softened
- ½ cup sugar
- 1 tsp vanilla extract
- 1 (7 oz jar) marshmallow creme/fluff
- 1 (8 oz pkg) Cool Whip, thawed
FOR GARNISH:
- Whipped cream
- Cubed & prepared Rice Krispy Treat Squares (I used the ones from the box)
Instructions
-
Grease a 9- or 10-inch springform pan liberally with cooking spray. Set aside.
-
Pour the 6 cups Rice Krispies cereal into a large mixing bowl; set aside for now.
-
In a medium saucepan over low heat, melt the ¼ cup salted butter together with the 10 oz package of miniature marshmallows, stirring constantly until the mixture is fully melted and smooth.
-
Immediately pour the melted marshmallow-butter mixture over the cereal in the bowl. Toss gently and thoroughly until the cereal is completely coated with the marshmallow mixture.
-
Transfer the coated cereal mixture into the prepared springform pan. Using a greased glass cup (or the bottom of a greased drink glass), press the cereal mixture firmly into the bottom and up the sides of the pan to form the crust and sides.
-
Let the crust set in the pan for about 20 minutes while you prepare the filling.
-
In the bowl of a stand mixer (or using a hand mixer) combine the softened cream cheese, ½ cup sugar and 1 tsp vanilla extract. Beat until smooth and creamy, about 1 minute.
-
Add the 7 oz jar of marshmallow creme/fluff to the cream cheese mixture and beat until smooth and fully incorporated.
-
Gently fold in the thawed 8 oz pkg of Cool Whip by hand (do not over-mix) until the filling mixture is fluffy and well combined.
-
Spread the filling mixture evenly into the prepared rice krispy crust, smoothing out the top with a spatula.
-
Pipe or dollop whipped cream around the perimeter of the cheesecake. Then, arrange the cubed prepared Rice Krispy Treat squares in the centre of the cheesecake for garnish.
-
Cover and refrigerate the cheesecake for at least 2 hours (or until set) before removing from the springform pan and slicing to serve.
Notes
This recipe was adapted from a version by Hayley Parker on The Domestic Rebel. thedomesticrebel.com
The crust sets faster if you refrigerate it for a short time before adding the filling, though the recipe works with the 20-minute rest as instructed.
The garnish “Cubed & prepared Rice Krispy Treat Squares” refers to pre-made or store-bought squares, cut into cubes and stacked in the cheesecake’s centre.
- Prep Time: 25 minutes
- Cook Time: 5 minutes
- Category: Dessert
- Method: No-Bake
- Cuisine: American
Keywords: rice krispy cheesecake, no-bake cheesecake, marshmallow cheesecake, rice krispies dessert