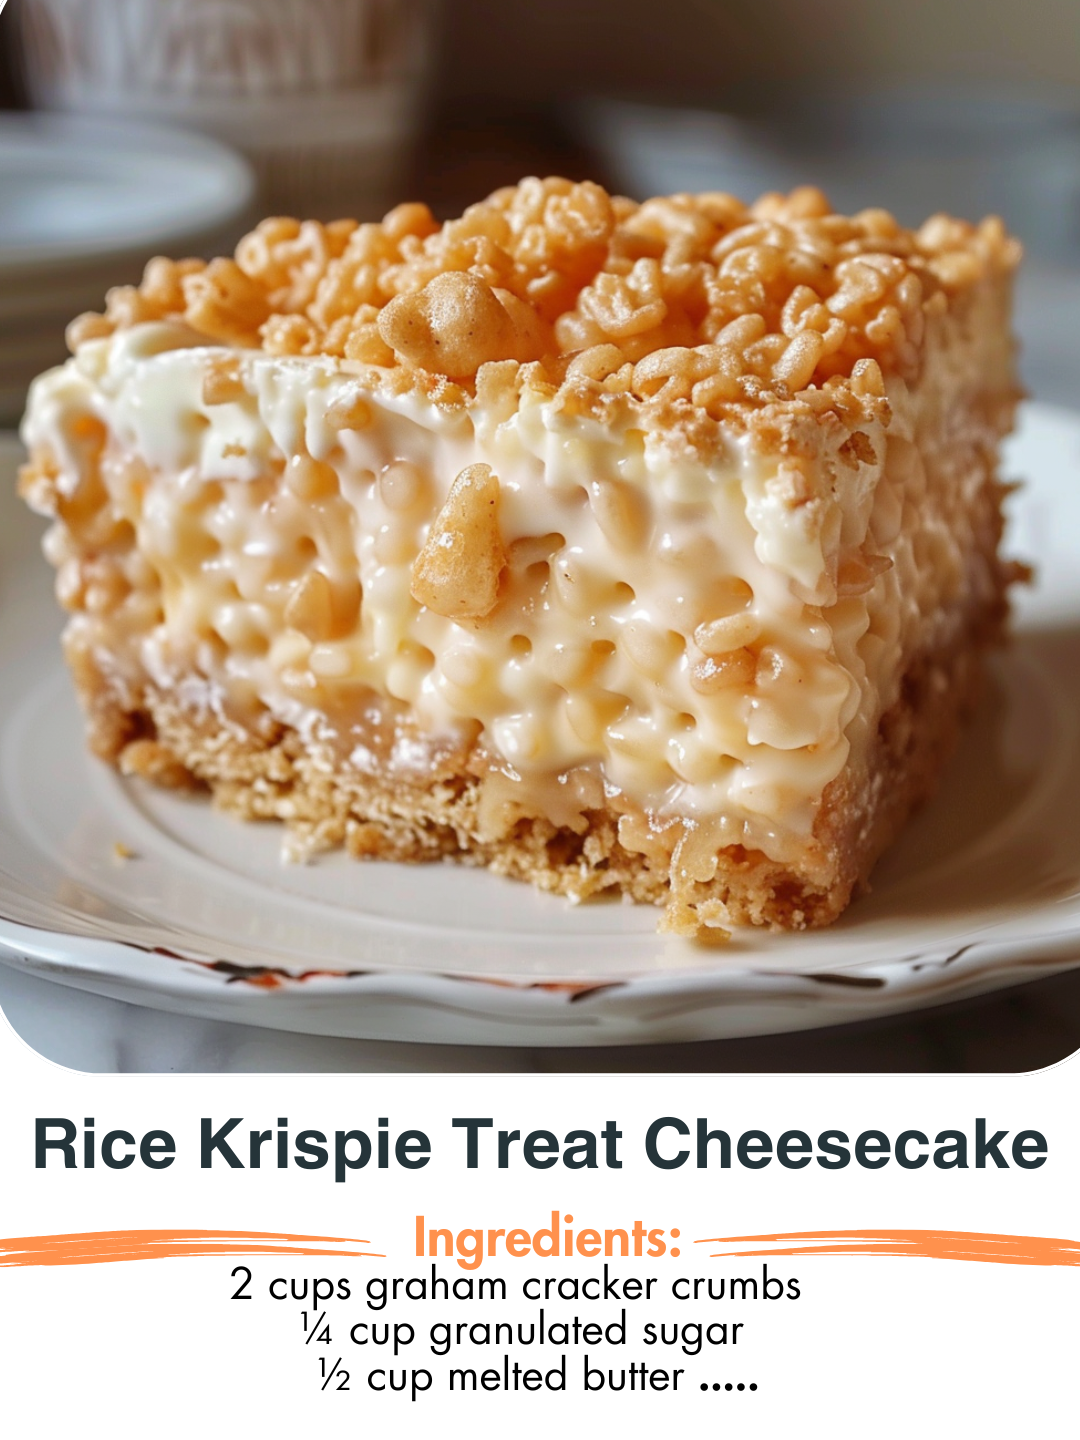
Imagine a silky, marshmallow-soft cheesecake nestled inside a crunchy, golden crust made entirely from rice krispies. That’s exactly what this show-stopper delivers. It’s the perfect blend of textures and flavors: crispy cereal, gooey marshmallows, creamy cheesecake filling, whipped topping, and extra cube pieces of rice krispy treats on top. No baking required, just chill and serve.
Why You’ll Love This Recipe
- No oven heat—ideal for warm days or when you want an easy dessert.
- Double texture appeal—a firm, crispy crust and a light, airy filling.
- Marshmallow-loving friendly—if you adore marshmallow fluff and wow factor, this one’s for you.
- Party-ready presentation—garnished with whipped cream and cubed rice krispy treat squares, it looks like a dessert pro made it.
- Versatile and fun—makes a great crowd-pleaser, birthday treat, or casual indulgence.
Ingredients
FOR CRUST:
6 cups Rice Krispies cereal
¼ cup salted butter
1 (10 oz pkg) miniature marshmallows
FOR FILLING:
1 (8 oz pkg) cream cheese, softened
½ cup sugar
1 tsp vanilla extract
1 (7 oz jar) marshmallow creme/fluff
1 (8 oz pkg) Cool Whip, thawed
FOR GARNISH:
Whipped cream
Cubed & prepared Rice Krispy Treat Squares (I used the ones from the box)
Directions
- Grease a 9- or 10-inch springform pan liberally with cooking spray. Set aside.
- Pour the 6 cups Rice Krispies cereal into a large mixing bowl; set aside for now.
- In a medium saucepan over low heat, melt the ¼ cup salted butter together with the 10 oz package of miniature marshmallows, stirring constantly until the mixture is fully melted and smooth.
- Immediately pour the melted marshmallow-butter mixture over the cereal in the bowl. Toss gently and thoroughly until the cereal is completely coated with the marshmallow mixture.
- Transfer the coated cereal mixture into the prepared springform pan. Using a greased glass cup (or the bottom of a greased drink glass), press the cereal mixture firmly into the bottom and up the sides of the pan to form the crust and sides.
- Let the crust set in the pan for about 20 minutes while you prepare the filling.
- In the bowl of a stand mixer (or using a hand mixer) combine the softened cream cheese, ½ cup sugar and 1 tsp vanilla extract. Beat until smooth and creamy, about 1 minute.
- Add the 7 oz jar of marshmallow creme/fluff to the cream cheese mixture and beat until smooth and fully incorporated.
- Gently fold in the thawed 8 oz pkg of Cool Whip by hand (do not over-mix) until the filling mixture is fluffy and well combined.
- Spread the filling mixture evenly into the prepared rice krispy crust, smoothing out the top with a spatula.
- Pipe or dollop whipped cream around the perimeter of the cheesecake. Then, arrange the cubed prepared Rice Krispy Treat squares in the centre of the cheesecake for garnish.
- Cover and refrigerate the cheesecake for at least 2 hours (or until set) before removing from the springform pan and slicing to serve.
Pro Tips and Variations
- Use a greased glass cup to press the crust—it helps achieve smooth, even sides and a firm base.
- For a firmer topping, make the garnish just before serving so the cubes stay crisp.
- Variation: Use flavored cereal (like vanilla or chocolate rice krispies) for a twist on the crust.
- If you don’t have a springform pan, line a 9-inch round cake pan with parchment and use the edges to lift the cheesecake out carefully.
- For lighter sweetness, reduce the sugar in the filling by 2-3 Tbsp and taste before chilling.
- Want a chocolate version? Mix in ¼ cup cocoa powder into the filling or drizzle melted chocolate over the top cubes.
Serving Suggestions
- Serve chilled, directly from the fridge.
- Slice with a warm, clean knife for neat, clean cuts.
- Pair with fresh berries or a fruit compote to balance the sweetness.
- Offer coffee or a light dessert wine to complement the richness.
- Ideal for potlucks, family gatherings or summer BBQs—its no-bake nature keeps it cool and effortless.
Storage / Reheating
- Store any leftovers in an airtight container or cover the springform pan with plastic wrap, and keep refrigerated.
- The cheesecake will stay fresh for up to 3-4 days in the fridge.
- Because the crust is cereal-based, it retains some crispness but may soften slightly over time—best when consumed within two days.
- Do not freeze this dessert; freezing may change the texture of the filling and crust.
FAQs
Can I use regular whipped cream instead of Cool Whip?
A: Using stabilized whipped topping like Cool Whip helps the filling stay tall and airy. Regular whipped cream may cause the filling to settle.
Will the cereal crust get soggy in the fridge?
A: According to the author, no—the crust remains crisp when chilled.
Can I make this ahead the night before?
A: Yes, you can. Just note the crust might soften a bit overnight.
What size pan do I need?
A: A 9- or 10-inch springform pan is recommended to achieve the tall crust and easier removal.
Conclusion
When you want a dessert that brings fun and flavor without turning on the oven, this Rice Krispy Treat No-Bake Cheesecake delivers. With a crunchy cereal crust, fluffy marshmallow-cream cheese filling and playful rice krispy cube garnish, it’s both nostalgic and show-stopping. Make it for your next gathering and watch how fast it disappears.

Rice Krispie Treat Cheesecake
- Total Time: 30 minutes
- Yield: 10–12 servings 1x
Description
A giant Rice Krispy Treat crust filled with marshmallow-cream cheese cheesecake—light, fluffy, and no oven required.
Ingredients
FOR CRUST:
- 6 cups Rice Krispies cereal
- ¼ cup salted butter
- 1 (10 oz pkg) miniature marshmallows
FOR FILLING:
- 1 (8 oz pkg) cream cheese, softened
- ½ cup sugar
- 1 tsp vanilla extract
- 1 (7 oz jar) marshmallow creme/fluff
- 1 (8 oz pkg) Cool Whip, thawed
FOR GARNISH:
- Whipped cream
- Cubed & prepared Rice Krispy Treat Squares (I used the ones from the box)
Instructions
-
Grease a 9- or 10-inch springform pan liberally with cooking spray. Set aside.
-
Pour the 6 cups Rice Krispies cereal into a large mixing bowl; set aside for now.
-
In a medium saucepan over low heat, melt the ¼ cup salted butter together with the 10 oz package of miniature marshmallows, stirring constantly until the mixture is fully melted and smooth.
-
Immediately pour the melted marshmallow-butter mixture over the cereal in the bowl. Toss gently and thoroughly until the cereal is completely coated with the marshmallow mixture.
-
Transfer the coated cereal mixture into the prepared springform pan. Using a greased glass cup (or the bottom of a greased drink glass), press the cereal mixture firmly into the bottom and up the sides of the pan to form the crust and sides.
-
Let the crust set in the pan for about 20 minutes while you prepare the filling.
-
In the bowl of a stand mixer (or using a hand mixer) combine the softened cream cheese, ½ cup sugar and 1 tsp vanilla extract. Beat until smooth and creamy, about 1 minute.
-
Add the 7 oz jar of marshmallow creme/fluff to the cream cheese mixture and beat until smooth and fully incorporated.
-
Gently fold in the thawed 8 oz pkg of Cool Whip by hand (do not over-mix) until the filling mixture is fluffy and well combined.
-
Spread the filling mixture evenly into the prepared rice krispy crust, smoothing out the top with a spatula.
-
Pipe or dollop whipped cream around the perimeter of the cheesecake. Then, arrange the cubed prepared Rice Krispy Treat squares in the centre of the cheesecake for garnish.
-
Cover and refrigerate the cheesecake for at least 2 hours (or until set) before removing from the springform pan and slicing to serve.
Notes
This recipe was adapted from a version by Hayley Parker on The Domestic Rebel. thedomesticrebel.com
The crust sets faster if you refrigerate it for a short time before adding the filling, though the recipe works with the 20-minute rest as instructed.
The garnish “Cubed & prepared Rice Krispy Treat Squares” refers to pre-made or store-bought squares, cut into cubes and stacked in the cheesecake’s centre.
- Prep Time: 25 minutes
- Cook Time: 5 minutes
- Category: Dessert
- Method: No-Bake
- Cuisine: American
Keywords: rice krispy cheesecake, no-bake cheesecake, marshmallow cheesecake, rice krispies dessert